Tutor Guide: Teaching Non-Native English Speakers
How to use the Fo√ne…tic √Ēng…lish tools to take ESL students from no English to fluent reading
Why teaching ESL students is different
A native English speaker who struggles to read has one core problem: they cannot reliably connect written letters to the sounds they already know. They can speak the language fluently. They know thousands of words. They just cannot decode the written form.
- An ESL student may face up to three separate problems at once:
- Sounds they cannot hear or produce. English has sounds that do not exist in many languages. A student who cannot hear the difference between two sounds cannot learn to read words that depend on that difference.
- Words whose meanings they do not know. Even if an ESL student can sound out a word perfectly, they may have no idea what it means.
- A spelling system that does not match sound. This is the same problem native speakers face — English spelling is erratic and does not give a reader enough information to decode a word reliably.
Fo√ne…tic √Ēng…lish solves the third problem for everyone. But for ESL students, the tutor must also address the first two. This is why the ESL teaching sequence starts differently — with sounds and pronunciation — before moving to the tools that native speakers use from the beginning.
The good news: ESL students who build a solid foundation in English sounds progress very quickly. Once a student can hear and produce English sounds accurately, everything else — syllables, vocabulary, reading — builds on that foundation and accelerates.
Know your student before you start
The single most important thing you can do before the first session is understand where your student is starting from. ESL students arrive with vastly different backgrounds, and the right starting point varies enormously.
- What to Find Out
Native language. This tells you immediately which English sounds will be easy, which will need practice, and which may be genuinely difficult to produce. The Fo√ne…tic √Ēng…lish tools have analysed a large number of languages and will reorganise the English Sounds tool based on the student's language. But knowing this in advance helps you plan the first session.
Literacy in the native language. Can the student read and write in their own language? This matters more than it might seem. A student who is literate in a phonetic language — such as Spanish, Italian, or Indonesian — already understands how to sound out written words letter by letter. They will grasp the concept of progressive sounding out immediately and will likely be reading English words within the first few sessions. A student who cannot read in their own language will need to be taught the concept of decoding from scratch.
Does the native language use the Roman alphabet? Students whose language uses Roman letters — French, Spanish, German, Vietnamese, Indonesian — face a specific challenge: they already associate sounds with those letters, but some of those associations are different in English. The letter 'j' in Spanish sounds nothing like 'j' in English. The letter 'e' in French is not the same as in English. These students need to actively unlearn some associations, which requires more deliberate practice than simply learning new ones.
Does the native language use a non-Roman script? Students whose language uses a different writing system entirely — Mandarin, Japanese, Arabic, Hindi, Korean — come without any preconceptions about what Roman letters sound like. This is actually an advantage: they have nothing to unlearn. However, some of these languages have Roman phonetic systems that students may know. Mandarin speakers may know Pinyin; Japanese speakers may know Romaji. Both use Roman letters but with different sound assignments to English, so the same issue of unlearning applies, though usually to a smaller set of sounds.
Prior English education and current level. Has the student studied English formally? For how long? Some students — particularly from Asian countries where English is taught extensively in schools — have a large passive vocabulary. They know what many words mean when they read them slowly, but cannot hear or speak English well because their schooling focused on grammar and translation rather than listening and speaking. These students need pronunciation work more than vocabulary work. Others are true beginners across the board.
Goals. Most adult ESL students have a specific goal. IELTS is the most common — a high IELTS score requires strong vocabulary across all CEFR levels from A0 to B2, and the ability to read extended texts with comprehension. Other students want English for work, travel, family, or study. Goals affect which vocabulary topics to prioritise and what kind of reading material to use in the eReader.
- What different backgrounds tell you
| Student background | What this means for your starting point |
|---|---|
| Speaks a phonetic language (Spanish, Italian, Indonesian) | Concept of sounding out words is already understood. Focus on Fo√ne…tic √Ēng…lish characters and missing/difficult sounds. Progress will be fast. |
| Speaks a language with Roman alphabet but different sounds (French, German, Vietnamese) | Must unlearn some letter-sound associations. Allow extra time on those specific letters. Use the 'close sounds' and 'missing sounds' categories carefully. |
| Speaks a language with Pinyin or Romaji (Mandarin, Japanese) | Knows Roman letters with different sound values. Treat these like Roman alphabet speakers for those specific letters. Missing English sounds need full attention. |
| Speaks a non-Roman script language with no prior Roman exposure (Arabic, Korean, Hindi) | No preconceptions to unlearn. Learns Fo√ne…tic √Ēng…lish characters fresh. Missing sounds are the main challenge. |
| Literate in own language | Understands the concept of written language. Can transfer literacy skills once sounds are established. |
| Not literate in own language | Must learn the concept of decoding from scratch alongside the sounds themselves. More time needed in early stages. |
| Studied English at school, large passive vocabulary | Focus on pronunciation and listening. May be able to move quickly through vocabulary. Get them reading early. |
| Heritage speaker (grew up hearing English at home) | Good auditory discrimination, possibly good pronunciation, some vocabulary. May not be able to read. Will progress very quickly through all stages. |
| True beginner, no prior English | Start at A0. First session is entirely sounds. Expect a slower initial pace that accelerates quickly once sounds are established. |
What the student sees in Fo√ne…tic √Ēng…lish text
- This section is the same as for native English speakers and is worth reading if you have not seen it already.
Fo√ne…tic √Ēng…lish em√beds āll tңê in…for√mâ…ťiòn yoů nêed tȷ √qüick…lý, in√tů…it…ive…lý and √acc…ů…rate…lý sijund ijut √än…ý √Ēng…lish wòrd, which is tңè √rê…ál ob√jec…tive of √Рho…nics 1.0. With Fo√ne…tic √Ēng…lish, thẂre iş next tȷ √nò…thing tȷ learn! √Män…ý √pêo…ဇle can √fig…ure ijut Fo√ne…tic √Ēng…lish just bΥ √sêe…ing text in Fo√ne…tic √Ēng…lish.
A student reading Fo√ne…tic √Ēng…lish text sees the word exactly as it appears in any English book or website. The spelling does not change. What Fo√ne…tic √Ēng…lish adds are visual cues layered on top of the existing letters:
- Sound characters appear as small superscript letters above a spelling character when that character does not make its usual sound. Once a student knows the Fo√ne…tic √Ēng…lish characters, these remove all ambiguity about which sound to make.
- Silent letters are greyed out. The student can see them — which matters for spelling — but knows not to say them.
- Syllable breaks are marked with a solid dot for the single stressed syllable and a hollow dot for an unstressed syllable. This guides the student to the correct rhythm and stress of the word.
Because the spelling does not change, a word the student learns to recognise in Fo√ne…tic √Ēng…lish text looks identical in any standard English book, website, or exam paper. There is nothing to unlearn when moving from Fo√ne…tic √Ēng…lish to standard English.
The core principle: building automaticity
- This principle applies to every stage of teaching, for every student.
- The goal is not for a student to consciously apply rules. The goal is for recognition to become so fast and effortless that the student does not have to think at all. This is called automaticity, and it is what separates a fluent reader and speaker from a struggling one. Fluent readers can devote all their focus to understanding what they read.
- There is a deeper reason fluent reading matters so much. When a person reads, they are silently saying the words to themselves in their head and the brain understands those silent words using the same systems it uses for spoken language. The closer a student's reading speed gets to their speaking speed, the more easily they understand what they read. The brain is simply doing what it has been doing since the student first learned to listen. For ESL students, this means fluent decoding is the foundation everything else rests on: a student whose reading is slow and effortful has no spare capacity to follow meaning across a sentence, let alone across a paragraph.
- The Fo√ne…tic √Ēng…lish tools measure automaticity directly through response time. When a student responds quickly and correctly, their brain is recognising — not calculating. When they are slow, they are still thinking it through. Your job is to help them move from thinking to recognising.
The ESL teaching sequence
- The sequence for ESL students follows the same overall path as for native speakers, but with one important addition at the beginning: a full focus on sounds and pronunciation before anything else.
- Here is why this matters. A student who cannot accurately hear the difference between two English sounds will build their entire vocabulary on a shaky foundation. They will mishear words, mispronounce them, and fail to recognise them when spoken at normal speed. Accurate auditory discrimination and pronunciation work is not a nice extra — it is the foundation that everything else depends on.
| Stage | Focus | When |
|---|---|---|
| 1 | English sounds — all 42 phonemes, with emphasis on missing and difficult sounds for the student's language | First session and ongoing until solid |
| 2 | Pronunciation training — mouth movements, recording and self-correction, auditory discrimination | Runs alongside Stage 1 from the first session |
| 3 | Syllable sounds — progressive sounding out, syllable recognition, word recognition by sight | Begins once student has a working knowledge of Fo√ne…tic √Ēng…lish characters |
| 4 | Vocabulary and early reading — learning word meanings through simple sentences, building sightwords | Begins early, runs in parallel with Stage 3 |
| 5 | Extended reading — eReader practice texts with comprehension questions | Typically from around Grade 3 equivalent reading level |
- Stages 3, 4 and 5 overlap and run in parallel once a student has a solid foundation in sounds. Stage 1 and 2 work must continue alongside the others whenever gaps are identified.
The teaching tools in detail
- Fo√ne…tic √Ēng…lish has 9 important tools. Each targets a specific skill. For ESL students, the English Sounds tool and the Pronunciation Training tools are far more central than they are for native speakers. The description below reflects the ESL-specific emphasis for each tool.
- Note: you can open two tool windows at the same time. This is essential for ESL students — for example, having the English Sounds tool open alongside the Pronunciation Instructions tool, or the eReader open alongside the Pronounce Any Word tool.
- Tool 1 — English Sounds
- This is where every ESL student starts. It covers all 42 English sounds and their Fo√ne…tic √Ēng…lish representations. For ESL students, the tool does something additional that is not needed for native speakers: it organises the sounds based on the student's native language.
- Select the student's language first
- Before doing anything else, select the student's native language from the dropdown menu. The tool will then reorganise the 42 sounds into three categories:
- Same sounds — sounds that exist in the student's native language and are produced identically. The student already knows how to make these. They just need to learn the Fo√ne…tic √Ēng…lish character that represents each one. This goes quickly.
- Close sounds — sounds that are similar to something in the native language but not identical. These usually require some attention and practice but are not difficult to acquire.
- Missing sounds — sounds that do not exist in the student's native language at all. These require the most work. The student must first learn how to make the sound physically, then learn to hear it reliably, and then practise it until recognition and production are automatic.
- Teaching the sounds in order
- Work through the sounds in this order: same sounds first, then close sounds, then missing sounds. This gives the student early wins, builds confidence, and ensures they understand how the tool works before encountering the harder material.
- For each sound, ask the student to click on the box to hear it and then produce the sound themselves. Watch and listen carefully. Even sounds the tool classifies as 'same' may not be produced accurately by every student — some students think they know a sound but are producing a slightly different version.
- The Roman alphabet challenge
- For students whose native language uses the Roman alphabet — French, Spanish, German, Italian, Vietnamese, Indonesian, and others — there is an extra layer of difficulty. These students already associate sounds with Roman letters, but some of those associations are different in English.
- For example, a French speaker sees the letter 'j' and instinctively produces the French sound for it — the 'zh' sound as in 'vision'. In English, 'j' makes a different sound entirely, as in 'jump'. The student must override an existing, automatic association and replace it with a new one. This takes deliberate repetition. Do not rush through these sounds. Spend extra time on any sound where the student's instinctive response is the wrong one.
- Pinyin and Romaji speakers
- Mandarin speakers who know Pinyin and Japanese speakers who know Romaji face a similar but smaller version of the same challenge. Both systems use Roman letters, but with different sound values to English. A Mandarin speaker may see the letter 'x' in Pinyin and think of the Pinyin 'x' sound, which is not an English sound at all. Identify which specific letters carry different values and give those extra attention.
- Words that start with missing sounds
- For each missing sound, the tool provides a list of ten common English words that begin with that sound. This is useful because it gives the student immediate real-world context. However, some sounds — such as the 'u' in 'put' and the 'zh' sound in 'vision' — do not commonly appear at the start of English words. For these, the word list uses words where the sound appears within the word. Some students may already recognise some of these words from borrowed English words, brand names, or place names in their own language, which can help them anchor the new sound.
- Tool 2 — Pronunciation Training
- This is the tool that makes the biggest difference for ESL students. Native speakers use it rarely if at all. For ESL students, it is central to the entire teaching process, particularly in the first sessions.
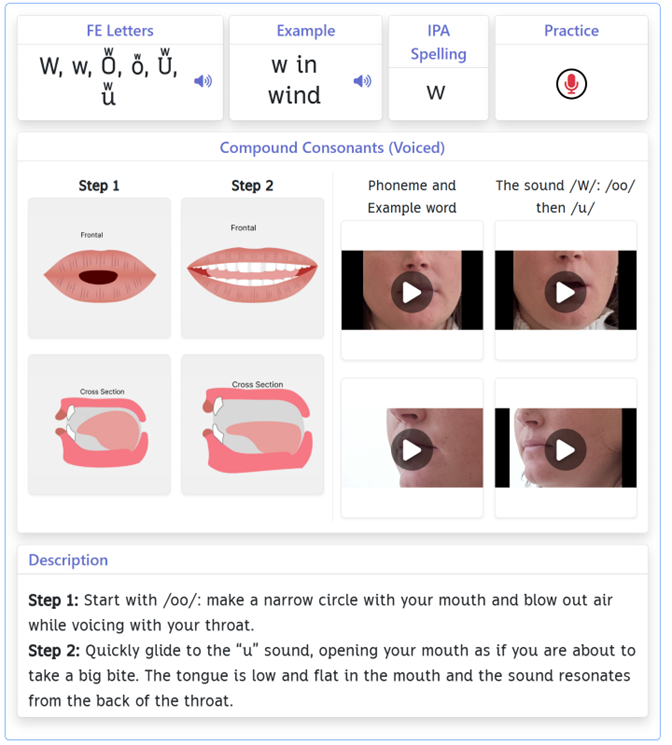
- Students are shown how to make each English sound. There are images of the mouth from the front and in cross section. There are videos from the front and the side. With a compound sound like /w/ which is made up of the sound /oo/ closely followed by /u/, there is a video of an English speaker making the sound /oo/ then /u/ and combining them into /w/. Students can also record their own sound and compare it with the reference sound on the website.
- As students practice making these sound, students will hear themselves making these sounds. This can be very helpful for some students.
- The tool has two distinct training systems: Missing Sound Training and Difficult Sound Training. These address different problems.
- Tool 3 - Soft Sounds: f, h, l, p, th
- The mouth movements for these sounds are relatively easy to make but the sound produced is soft, so a number of students don’t think they are making the sound correctly when they are. These sounds are almost never used by themselves in English: they are always followed by a vowel. Fo√ne…tic √Ēng…lish has taken the 5 soft sounds and recorded each of the soft sounds followed by a vowel. Regardless of their native language, students can practice their pronunciation by recording their sound and comparing it to the reference sound on the website.
- Tool 4 - Missing Sound Training
- A missing sound is one that does not exist in the student's native language. The student has never produced this sound before and may struggle even to hear it accurately. Missing Sound Training follows three stages:
- Tool 5 - Difficult Sound Training
- Difficult sounds are different from missing sounds. A difficult sound contrast occurs when two English sounds exist in the student's language but are confused with each other. The student can produce both sounds but cannot reliably distinguish them in English. This means that difficult sounds are taught in pairs.
- The most common example is l versus r — a contrast that is difficult for many East Asian language speakers. Both sounds exist in some form in these languages, but not as distinct phonemes. The student hears them as the same sound and produces them interchangeably.
- Other common difficult contrasts include:
- Unvoiced 'th' versus 't' (as in 'think' versus 'tank')
- Unvoiced 'th' versus voiced 'th' (as in 'think' versus 'that')
- Voiced and unvoiced pairs: f/v, s/z, sh/zh, p/b, t/d, k/g
- Mouth movement exercises: suggested exercises for specific languages are available in the tutor section of the website — show students and parents where they are and how to use them.
- For voiced and unvoiced pairs, a useful teaching exercise is to have the student keep their mouth still and change the sound by engaging and disengaging the voice box.
- Alternate mouth movements e.g. making the sounds: 'l r l r l r' in quick succession can help the student to integrate the mouth movements so that they make the correct mouth movements when pronouncing l or r without having to think. This builds muscle memory and helps the student feel the physical difference between the two sounds.
- The Difficult Sound Tool uses the Sounding out Syllables tool to teach difficult sound pairs to students. The lessons are different for each language, as each language has different difficult sound pairs. The lessons are indexed by the two difficult sound pairs being taught, so a student wanting to learn a difficult sound first selects their native language and then selects the Fo√ne…tic √Ēng…lish characters that makes the difficult sound pairs from a drop down list of difficult sound pairs. Difficult sound lessons contain the missing sound pairs and real English words in Fo√ne…tic √Ēng…lish that differ only in the difficult sound — for example, 'thank' and 'tank', or 'thin' and 'tin'. The student hears a word and must select the correct box. Lessons are named using the two contrasting sounds, for example l–r.1, l–r.2, th–t.1, and so on.
- Tool 6 — Sounding Out Syllables
- Once a student has a working knowledge of the Fo√ne…tic √Ēng…lish characters and can produce the main English sounds, this tool becomes the engine of decoding progress. It teaches students to recognise the sounds of syllables quickly and reliably. Once a student can recognize a number of syllables, the student can sound out words syllable by syllable to quickly learn to recognize words by sight – sightwords – you see a word, recognize its shape and instantly know its sound and meaning.
- Why syllables?
- A syllable is short. Because it is short, it puts very little load on working memory — the part of the brain that holds information while thinking. Working memory can only hold about 2 to 4 new pieces of information at a time, and for as little as 20 seconds.
- When a student learns the sound of a syllable — sees it and instantly knows its sound — that syllable moves into long-term memory and no longer occupies working memory space. Learning just 200 of the most common syllables is enough to decode thousands of English words by sounding the words out syllable by syllable.
- Progressive sounding out
- The key technique is progressive sounding out. Rather than saying each sound separately and then trying to blend them (/c/ ... /a/ ... /t/ ... cat), the student builds the syllable step by step:
- /m/ → /me/ → /men/ → /ment/
- At each step, the student holds only two things in working memory: the sound built so far, and the next sound to add. This keeps cognitive load small and makes accurate blending much easier.
For students from phonetic language backgrounds: the concept of progressive sounding out will be immediately intuitive. These students already know how to decode written words by sounding them out, because they do it in their own language. Once they grasp the Fo√ne…tic √Ēng…lish characters, progress on syllables tends to be fast.
For students from non-phonetic or logographic language backgrounds: for example, speakers whose native writing system uses characters rather than letters — the concept of sounding out may need more time to establish. These students may initially try to memorise the whole word rather than decode it sound by sound. Demonstrate progressive sounding out clearly and practise it explicitly before moving into Practice Mode. [Note: both Mandarin and Japanese are logographic languages, but Pinyin for Mandarin and Romaji for Japanese are Roman alphabet representations used for typing in words on a QWERTY keyboard which are then translated into a logographic character.
- Learning Mode
- The student sees a grid of syllable boxes. Clicking a box plays the full syllable. Clicking the speaker icon plays the syllable progressively sounded out. The student repeats each syllable aloud. The recording feature is available here — encourage students to use it to compare their pronunciation with the reference.
- Practice Mode — Basic
- The student has the same 6 boxes as in Learning Mode. A sound is played and the student clicks the correct syllable. Response time is recorded. The aim is to drive response times down until recognition is automatic.
- Practice Mode — Advanced
- Advanced mode displays syllables the student may not have seen before. A sound is played and the student must click the box or boxes that contain characters representing that sound – there can be more than one box. This requires decoding on the fly — which reinforces Fo√ne…tic √Ēng…lish character sounds and builds the habit of sounding out syllables progressively.
- Tool 7 - Pronounce Any English Word
- The student types in any word and hears it pronounced — as a whole word, syllable by syllable, and with each syllable progressively sounded out. This is an essential reference tool for ESL students during reading. Open it in a window alongside the eReader so the student can look up any word immediately.
- Tool 8 — Vocabulary
- A native speaker learning to read already knows what a lot of words mean — they just cannot decode the written form. It is assumed that native English speakers already know the meaning A0 and A1 CEFR words. Clicking on a word will display the meaning of the word written in very simple English: e.g. the meaning of an A2 word will be written using A0 or A1 words.
- Vocabulary is far more central for ESL students than for native speakers. An ESL student must learn both the sound and the meaning simultaneously.
- The Fo√ne…tic √Ēng…lish vocabulary system teaches words in sentences rather than as isolated items. This matters because words change meaning depending on context, and sentences give the student the auditory, visual, contextual, and translational cues all at once. Research consistently shows that multiple simultaneous cues produce much stronger and more lasting memory than a single cue.
- Two Vocabulary Systems
- The vocabulary tool has two parts that students move through in sequence.
- Basic Vocabulary covers A0 and A1 — the simplest everyday English. Every word can be clicked to reveal its translation into the student's native language, the part of speech, and, where the word has multiple meanings, the precise meaning that applies in that sentence. Whole sentences can also be translated. Translation is essential at this level: ESL students cannot reliably infer meaning from English context alone when their stock of known English words is still very small.
Intermediate Vocabulary covers A2, B1 and B2. Translation stops here. The student is presented with two sentences each containing a blank, and chooses from a small set of options the one word that fits both sentences naturally. This forces the student to use exactly the inference skill they have been practising at A0 and A1, but now in English alone.
The Intermediate sentences are deliberately built almost entirely from A0 and A1 words the student already knows. So as the student learns each new A2, B1 or B2 word, the surrounding words are reinforcing earlier vocabulary at the same time. Forward progress and consolidation happen together.
The transition from Basic to Intermediate is a real shift in the student's experience and worth flagging in advance. Students who have come to rely on translation may push back when it disappears. Frame the change positively: by the time they reach A2, they have enough English to work out new meanings without falling back to their first language, and that ability is itself an important step toward fluency.
- Teaching vocabulary through sentences also means that every vocabulary session is doing four things at once. The student is learning what words mean. They are learning to read decoding real sentences in Fo√ne…tic √Ēng…lish text, not isolated words. Because the sentences are written as natural conversational exchanges, the student is also learning how English speakers actually communicate: how questions are formed, how answers are phrased, how everyday interactions work. And because every sentence is grammatically correct, the student is absorbing correct English grammar through repeated exposure the same way native speakers acquire grammar naturally, without having to memorise rules. A student finishing a vocabulary session has not just learned words they have been reading, absorbing conversational English, and internalising correct grammar the entire time.
- The learning cycle
- Every word is learned through the same cycle. In the early sessions, walk the student through each step explicitly; later, they will do all of this on their own.
- Read. The student reads the sentence in Fo√ne…tic √Ēng…lish. The Fo√ne…tic √Ēng…lish markup means decoding is reliable from the very first encounter with a new word, so the student does not waste effort working out how it sounds.
- Listen. The student clicks the speaker symbol to hear the sentence read by a native speaker. This confirms that their decoding of the Fo√ne…tic √Ēng…lish markup matches the real sound of the words.
- Record. The student clicks the microphone symbol to record their own attempt at the sentence. The system plays the reference and the student's recording back to back, repeatedly, so the student can hear the difference and bring their pronunciation closer to the model. This step trains rhythm and intonation, not just individual sounds.
- Infer. Before clicking on the target word, the student tries to work out its meaning from the sentence around it. This step is critical — students who infer before clicking remember the word approximately three times longer than students who click immediately.
- Quiz. After every five or so sentences, the system presents a short quiz. The student must pass three times per word for the system to record that the student knows the word.
- Review. Spaced reviews are scheduled automatically: 2 days, then 1 week, 2 weeks, 1 month, 2 months, and ongoing. Without spaced reviews, approximately 80% of new vocabulary is forgotten within a month. With them, retention reaches 95% or more.
- Why this method works
When the student goes through the cycle above, they are doing eight useful things at the same time. It is worth understanding all of them, because if a student is not progressing, the cause is usually that one or more is being skipped:
- The student is inferring meaning from context, which is what makes words stick.
- The student is confirming those inferences in their own language, so they know the correct meaning even if the inference was not right.
- The student is seeing Fo√ne…tic √Ēng…lish markup, so correct pronunciation is built in from the very first encounter with a word.
- The student is hearing the sentence pronounced, so they can check their decoding of the Fo√ne…tic √Ēng…lish markup against the real sound.
- The student is meeting words inside the kind of sentences they will actually use, not in isolation.
- The student is absorbing basic grammar — word order, the difference between a statement and a question, simple verb forms, common prepositions — without having to study it directly. ESL students often arrive convinced they need separate grammar study; reassure them that the sentences are doing this work quietly.
- The student is recording their own voice, which trains not only the sounds but the rhythm and intonation of English.
- And because the student is reading throughout, their reading improves alongside their vocabulary.
A student who rushes through sentences without recording, clicks immediately without trying to infer, or skips the quizzes is losing several of these benefits at once. Use the dashboard to spot these patterns and intervene early.
- Vocabulary levels for ESL students
- Vocabulary is organised by CEFR level: A0, A1, A2, B1, and B2. Unlike native speakers, ESL students cannot be assumed to know A0 or A1 vocabulary already. The tutor should estimate a starting level based on what they know about the student and adjust quickly based on what the first session reveals.
| Starting point | Recommended vocabulary level |
|---|---|
| True beginner, no prior English | A0 — 349 core survival words |
| Some basic English (greetings, numbers, colours) | A0–A1, skip known items quickly |
| Studied English at school, can read slowly | A1–A2 — assess first session |
| Conversational English, wants IELTS preparation | A2–B1 — assess and place precisely |
| Strong spoken English but weak reading/writing | Test at B1, may be able to start higher |
| Heritage speaker (English heard at home) | Assess carefully — may know B1+ vocabulary but lack reading skill |
- These are starting points only. Adjust immediately based on performance. If the student knows more than 70% of words at a level already, move up. If they are struggling with more than 30% of new words, move down.
- Inside Basic Vocabulary: A0 survival sentences
- A0 is where every true beginner starts within Basic Vocabulary.
- A0 vocabulary is taught through very simple survival sentences — short, practical exchanges covering introductions, basic needs, location, food, numbers, and everyday communication. These sentences use only A0 words and are designed to be immediately useful in real life. Because the sentences are readable in Fo√ne…tic √Ēng…lish from the start, A0 vocabulary work also introduces the student to reading in Fo√ne…tic √Ēng…lish right away.
- Translation: essential for ESL, not optional
- For ESL students, the translation feature is essential. Every word can be translated into the student's native language at the word level. Every sentence can be translated as a complete sentence. Use the sentence-level translation rather than word-by-word wherever possible, because many words change meaning depending on context and the sentence translation gives the meaning that is correct for that specific use.
- Translation is available throughout Basic Vocabulary (A0 and A1). At Intermediate Vocabulary (A2 onwards) translation is no longer offered — by that point the student has enough English to infer meanings without falling back to their first language, and the two-sentence MCQ method requires them to do exactly that.
- Prefixes and suffixes
- The vocabulary tool includes courses teaching the meaning of common prefixes and suffixes. This is particularly valuable for ESL students because it allows them to infer the meaning of words they have never seen before. A student who knows the root word 'act' and knows that 're-' means again and '-ion' turns a verb into a noun can work out what 'reaction' means without being taught it directly. This reduces the total vocabulary learning load by approximately 30%.
- The tutor's role changes as vocabulary progresses
- In the first few sessions, your role is to teach the student how to use the vocabulary system correctly: infer before clicking, complete daily spaced reviews, take quizzes seriously. Once these habits are established — typically after the first three to four weeks — the student can work largely independently. Your role then shifts to accountability: checking the dashboard, identifying problems early, and keeping the student on track.
- For students aiming at IELTS, make clear that consistent daily practice is non-negotiable. The expected rate with 30 to 35 minutes of practice per day is approximately 90 to 110 new words per week. At that rate, a student can move from A0 to B2 — all 6,200 words across all levels — in 13 to 17 months. More practice can reduce that time.
- Tool 9 — The eReader
- The eReader is where extended reading practice happens. For ESL students, it serves two purposes simultaneously: building reading fluency and reinforcing vocabulary in context.
- When to start reading
- Introduce the eReader as soon as the student can decode short sentences. This is earlier than you might expect. Students do not need to have mastered all 42 sounds or all common syllables before they start reading. Vocabulary sentences in Fo√ne…tic √Ēng…lish are readable from the very early stages, and getting students reading real text quickly is one of the best ways to reinforce everything else they are learning.
- Extended reading practice with longer texts and comprehension questions typically begins when a student has enough vocabulary and decoding ability to read a passage of several sentences without stopping at every word — roughly equivalent to a Grade 3 reading level.
- What the eReader provides for ESL students
- Tap any word to hear it pronounced and see the syllables sounded out progressively.
- Word-by-word translation into the student's native language.
- Full sentence translation means a word in a sentence has just one meaning: contrast this to looking up a word in a dictionary. The word may have multiple meanings in the dictionary, and the student needs to select the right meaning.
- If the student opens the Pronounce any English Word tool and positions it next to eReader window, the student can compare the student's own pronunciation to the reference pronunciation using the recording feature.
- Comprehension questions at the end of each text. Wrong answers receive a hint and require a second attempt. The student cannot move to the next question until they have selected the right answer, which can improve the student’s reading comprehension.
- What to read
- Choose texts that are slightly challenging — enough new vocabulary to provide learning, not so many unknown words that the student cannot follow the meaning. For IELTS preparation, include texts from the kinds of topic areas that appear in IELTS: travel, science, society, technology, environment, culture.
- The eReader can also handle texts generated specifically for the student's interests or study subjects. A student studying history can read history content. A student preparing for a nursing qualification can read medical English. The system can generate materials written at the right level for any subject area, so the student builds English skills while learning content that matters to them. If a student is learning Indonesian history in Indonesian, Fo√ne…tic √Ēng…lish can write English reading practice materials that contain the core elements of the Indonesian history course, helping the student learn their course.
- The first session
- A first session for an ESL student will usually run for about an hour. The entire session is focused on sounds — this is different from the native speaker guide, where the first session introduces syllables as well. For ESL students, sounds need more time.
- Students need to learn Fo√ne…tic √Ēng…lish so that a student knows what sound is being represented by a Fo√ne…tic √Ēng…lish character.
- Step 1 — Talk first (10 minutes)
- Before opening any tool, have a conversation. Find out:
- What is the student's native language?
- Can they read and write in their native language?
- Have they studied English before? For how long? What kind of study?
- What is their goal — IELTS, work, travel, family, study?
- How do they feel about learning English? Some students are embarrassed or frustrated; others are eager. This affects how you frame the session.
- Then explain briefly what Fo√ne…tic √Ēng…lish is and what the session will involve:
- Step 2 — English Sounds tool (30–40 minutes)
- The tutor should introduce Fo√ne…tic √Ēng…lish to the student so that the student can understand what sounds the Fo√ne…tic √Ēng…lish characters represent, which is needed to understand the English Sounds tool.
- Then the tutor should select the student's native language from the dropdown. The tool will organise the sounds into same, close, and missing categories.
- Work through the same sounds first. Ask the student to click each box and produce the sound. These should be easy — but watch carefully, because some students produce a slightly different version of what they think is the same sound. Also show the student the Fo√ne…tic √Ēng…lish character that represents the sound. The student needs to learn that character because that character is the way we refer to the sound.
- Move to the close sounds. Ask the student to click and produce each one. Listen for accuracy.
- Work through the missing sounds. Open the Pronunciation Instructions tool in a separate window. Help the student get their camera open alongside it. For each sound the student cannot produce accurately, work on the physical production of the sound with the student. You will be able to see and explain to the student how the student can make the mouth movements more accurately.
- Note every sound that needs more work. Do not spend so long on any single sound that the session stalls — make a note and come back to it.
- If time allows, move into Practice Mode — Advanced. Have the student hear a sound and select the correct FE character. Watch response times.
- Do not expect to finish all 42 sounds perfectly in the first session. The goal is to identify the landscape — which sounds are solid, which need practice, which are missing — and begin working on the most important gaps.
- Step 3 — Teach self-correction with the recording feature (10 minutes)
- Before the session ends, teach the student how to use the recording feature to self-correct. This is one of the most valuable things you can give an ESL student for independent practice.
- Open the Missing Sound tool. Find a syllable containing a sound the student struggled with in the pull down lesson list.
- Show the student the red microphone icon. Explain that clicking it lets them record their pronunciation.
- Have the student record themselves. Play back their recording alongside the reference recording.
- Ask the student: what do you notice? Help them hear the difference. Ask them to try again.
- Repeat until the student can self-correct without your input.
- Step 4 — Assign homework (5 minutes)
- Be specific. Do not say 'practise the sounds'. Say:
- 'Use the Pronunciation Instructions tool for [specific sound]. Practice for 10 minutes. Record yourself and compare to the reference.'
- 'Do Practice Mode on the same sounds and close sounds. Aim for response times under 2 seconds.'
- The tools are self-correcting, so the student can practise independently without supervision. Encourage short daily sessions of 10 to 15 minutes rather than one long session.
- Ongoing sessions
- After the first session, a typical 30 to 60 minute session follows this pattern:
- Check the dashboard first
- Which sounds or syllables still have slow response times?
- Which sounds does the student consistently get wrong?
- Are vocabulary reviews being completed on time?
- Did the student complete the recording homework?
- Use this data to plan the first 10 minutes of the session. Go straight to the specific problem and work on it until the response time drops or the accuracy improves.
- How the balance shifts over time
- In the first few sessions, most of the time is spent on sounds and pronunciation. As the student builds a solid foundation in sounds, the balance shifts toward syllables, then toward vocabulary, and then toward reading.
| Phase | Typical session balance |
|---|---|
| Sessions 1–3 | 70% sounds and pronunciation, 30% syllables and |
| Sessions 4–6 | 40% sounds and pronunciation, 40% syllables, 20% vocabulary sentences |
| Sessions 7–12 | 20% sounds (targeted gaps only), 40% syllables and word recognition, 40% vocabulary |
| Sessions 13+ | 10% sounds (as needed), 30% vocabulary, 60% reading |
- These are rough guides, not rules. Every student is different. A student who makes rapid progress on sounds may be reading within three sessions. A student with many missing sounds may need six sessions before syllable work becomes productive.
- When a student stumbles on a word while reading
- Ask them to look at the Fo√ne…tic √Ēng…lish cues on the word.
- If they cannot decode it, ask them to break it into syllables and sound each one out progressively.
- If they still cannot manage it, use the Pronounce Any English Word tool to hear it together.
- If the word contains a sound they have been struggling with, make a note and return to it in the pronunciation section of the session.
- Move on quickly. Do not dwell on a single word for too long.
- Locating and plugging gaps
- The single most useful principle for teaching ESL students with Fo√ne…tic √Ēng…lish is this: find out what the student does not know, and teach that. Do not work through a fixed sequence if the student already knows parts of it.
- Every student arrives with a different combination of strengths and gaps. Your job in the first session — and in the first few minutes of every subsequent session — is to locate the current gaps and focus the teaching time on them.
- Common gap patterns and how to address them
Student can speak English but cannot read it
This is common among heritage speakers and people who learned English informally. These students often have good pronunciation and a reasonable vocabulary, but no connection between spoken words and their written form. They may find the Fo√ne…tic √Ēng…lish characters confusing at first because they have never needed to think about the sounds of individual letters.
Focus on: the Fo√ne…tic √Ēng…lish characters and what they represent. Use the English Sounds tool but move quickly — they can already produce the sounds. The challenge is linking sounds to characters, not producing the sounds themselves. Move to syllables and then reading as quickly as possible.
Student can read English slowly but cannot hear or speak it well
This is very common among students who studied English through grammar and translation, particularly in Asian school systems. These students may know a large number of written word meanings but have poor auditory discrimination and weak pronunciation. They may be surprised to discover how much of their vocabulary they cannot actually recognise when spoken aloud at natural speed.
Focus on: the full pronunciation training sequence. The missing and difficult sounds work is essential here. Get the student recording and comparing their pronunciation early. Some students who are sensitive to criticism may find practicing by themselves is a welcome relief. Reading can continue in parallel using texts they can read slowly, but the core work is pronunciation.
Student knows no English at all
The first session is entirely sounds. Begin with the same sounds for the student's language, move to close sounds, then begin the missing sounds. Assign pronunciation homework from the first session. Vocabulary sentences begin as soon as the student has a working knowledge of the Fo√ne…tic √Ēng…lish characters — this can start in the second or third session using A0 survival sentences.
Student has good English but specific pronunciation problems
For example, a student who is fluent and has a large vocabulary but cannot reliably produce the 'r' versus 'l' contrast, or the 'th' sounds. In this case, skip the early stages and go straight to the specific difficult sound training for those contrasts. Use the difficult sound lessons and alternate mouth movement exercises. This is the most efficient path for a student who is close to their goal but has specific gaps.
- The dashboard and homework
The tools log everything: which items were attempted, whether answers were correct, and how long each response took. For ESL students, the dashboard is especially important because there are more variables to track — sounds, syllables, vocabulary, and reading all running in parallel.
- What to check before each session
- Response times on specific sounds and syllables — anything slow is a target for the session.
- Error patterns — consistent errors on specific sounds indicate a discrimination problem, not just a speed problem.
- Vocabulary review completion — are spaced reviews being done on time? If reviews pile up, retention collapses.
- Inference behaviour — is the student pausing before clicking, or clicking immediately? Immediate clicking means they are not building the inference habit.
- Homework completion — the data will show whether the student practised.
- Assigning homework
Be specific. For each homework item, say exactly what to do, which tool to use, and what target to aim for. Examples:
- 'Use the Pronunciation Instructions tool for the unvoiced th sound. Record yourself 10 times and compare each recording to the reference. Stop when your recording sounds the same as the reference to you.'
- 'Do Practice Mode — Basic on syllable lessons 1 to 15. Aim for response times under 2 seconds.'
- 'Complete your vocabulary reviews before starting any new sentences.'
- 'Read the next section of the text we started today. Click on every word you are unsure about.'
For ESL students, daily practice is especially important because sounds and vocabulary both require frequent repetition to become automatic. Encourage 15 to 20 minutes per day rather than one long session before each lesson. Short, frequent practice is far more effective than occasional long sessions for building the neural pathways that underlie fluency.
- Quick reference
| Situation | What to do | Tool to use |
|---|---|---|
| New student, first session | Talk first. Select native language. Work through same sounds, close sounds, missing sounds. Teach recording feature. | English Sounds → Pronunciation Instructions |
| Student cannot produce a missing sound | Open Pronunciation Instructions. Help student set up camera. Work on lip/tongue position. Practise until the sound is close. | Pronunciation Instructions |
| Student confuses two similar sounds | Use Difficult Sound lessons. Alternate mouth movement exercises. Use real word pairs that differ only in the problem sound. | Pronunciation Training — Difficult Sounds |
| Roman alphabet speaker with wrong letter-sound association | Extra repetition on that specific character. Do not rush. The old association is automatic and takes time to override. | English Sounds — Advanced Practice |
| Student from phonetic language background | Move quickly through sounds to syllables. Progressive sounding out will be intuitive. Focus on | Syllable Tool |
| Student knows words but cannot hear them spoken | Full pronunciation sequence. Recording and self-correction homework. Prioritise listening discrimination. | Pronunciation Instructions — Syllable Tool |
| Student bored with sounds, wants to start vocabulary | Start A0 vocabulary sentences alongside sounds. Keep sounds as homework. | Vocabulary → Sounds (homework) |
| Student stumbles on a word while reading | Pronounce Any English Word | |
| Student clicking vocabulary without inferring | Stop. Ask what they think the word means. Explain the 3x retention benefit. Check dashboard for pause indicators. | Vocabulary — Dashboard |
| Vocabulary reviews piling up | Make reviews mandatory. No new sentences until reviews are done. Explain why reviews prevent forgetting. | Vocabulary — Dashboard |
| Student has good English, specific pronunciation gap | Skip early stages. Go straight to the relevant Difficult Sound contrast lessons. | Pronunciation Training — Difficult Sounds |
| Student does not complete homework | Look at the dashboard together. Find out why. Adjust assignments if needed. Short daily sessions are better than one. | Dashboard |
| Student wants to know what a word means | Use vocabulary tool. Use sentence translation rather than word-by-word where possible. | Vocabulary / |
| IELTS preparation | Ensure A0 to B2 vocabulary coverage. Use reading texts matching IELTS topic areas. | Vocabulary → eReader |
